

How to Perform a Bubble Leak Test for Low Vacuum Systems
Maintaining leak-tight integrity is one of the most important factors in ensuring reliable vacuum performance. Even small leaks can compromise pressure stability, lengthen pump-down times, and contaminate processes. For high and ultra-high vacuum systems, helium mass-spectrometer leak detection is the gold standard. But when you’re working with low vacuum systems (roughly down to 10⁻³ mbar / 10⁻³ torr), a more practical and cost-effective method often makes more sense: the bubble leak test.
The bubble leak test is one of the oldest and simplest methods of leak detection. It is inexpensive, straightforward to perform, and requires minimal equipment. In this article, we’ll walk through how to perform a bubble leak test for low vacuum systems, when it’s appropriate to use, its advantages and limitations, and best practices for reliable results.
What Is a Bubble Leak Test?
A bubble leak test relies on the principle that gas escaping through a leak path will form visible bubbles when submerged in—or coated with—a liquid film. The technique is common in plumbing and pressure vessels and adapts well to rough/low-vacuum gear.
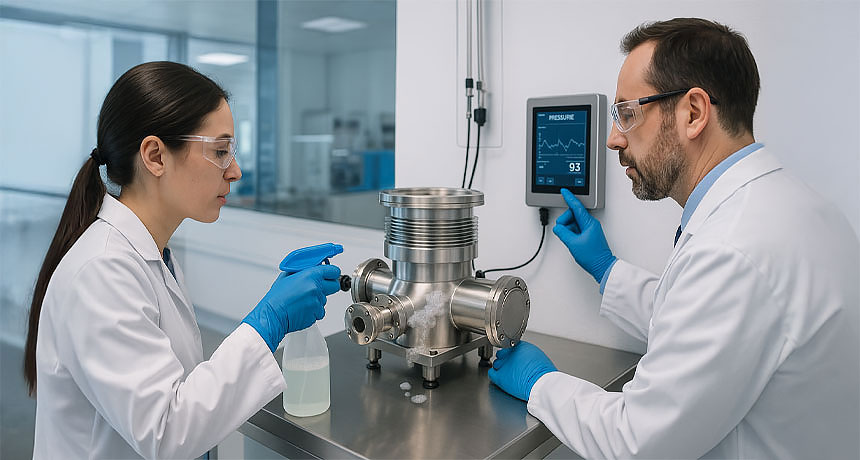
The typical approach is to pressurize the system slightly above atmospheric pressure with air or an inert gas, then apply a soap solution or commercial leak-detection fluid to suspect joints and seams. Escaping gas creates a visible bubble trail that pinpoints the leak location.
When to Use a Bubble Leak Test
- System pressure is low: Rough or low vacuum environments (not UHV).
- Leaks are relatively large: Sensitivity is typically on the order of ≥10⁻³ to 10⁻⁴ mbar·L/s in practiced hands.
- Rapid troubleshooting is needed: It’s fast and intuitive for field diagnostics.
- Cost is a concern: Bubble testing avoids specialized instruments.
It is not appropriate when you must find ultra-small leaks (as in high or UHV validation) or when the system cannot be safely pressurized.
Safety Considerations (Read First)
- Use an inert gas (nitrogen recommended). Avoid oxygen-rich gases near oils/greases.
- Limit test overpressure: For most bench-scale vacuum hardware, 1–5 psig (0.07–0.35 bar) is adequate. Verify the vessel’s allowable working pressure before testing.
- Mind compatibility: Some bubble fluids can attack elastomers or leave residues—use products rated for metals/elastomers in your system and clean thoroughly afterward.
- Electrical safety: De-energize or isolate electronics that may be exposed to liquids.
Required Materials
- Bubble-forming liquid: Commercial leak-detector fluid or a mild, diluted dish-soap solution.
- Applicator: Spray bottle, squeeze bottle with brush, foam swab, or small paintbrush.
- Clean, lint-free wipes and deionized water for cleanup.
- Pressure source and gauge: Nitrogen bottle/regulator or clean compressed air, plus a low-range gauge to monitor test pressure.
- Marker or tags for flagging leak locations.
Step-by-Step Procedure
1) Isolate and Prepare
- Shut down the vacuum pump and vent the system to atmospheric pressure.
- Close valves to protect sensitive components that shouldn’t be exposed to liquid (e.g., gauges not rated for liquids, electronics, getters).
- Wipe dust/oil from joints so the bubble film can wet the surface uniformly.
2) Pressurize Slightly Above Atmospheric
- Connect your regulated nitrogen (preferred) or clean, dry air source.
- Raise pressure slowly to 1–5 psig (0.07–0.35 bar) unless your equipment’s data sheet specifies a lower limit.
- Stabilize for 1–2 minutes so trapped volumes equalize.
3) Apply Bubble Solution Methodically
Starting at the gas source and moving toward the chamber, systematically coat suspected leak sites:
- CF/KF/ISO flanges and O-rings
- Weld seams and braze joints
- Valve stems, bonnet joints, and compression fittings
- Sight glasses, viewport seals, quick-disconnects, and blank-offs
Use enough solution to form an even film; avoid heavy pooling that can mask bubble formation.
4) Observe and Confirm
- Watch each site for growing bubbles (steady trails or expanding blisters). Small leaks can take 10–30 seconds to show—be patient.
- If bubbles appear, mark the location. Gently re-apply to confirm repeatability.
- Where access is awkward, a small mirror or borescope helps you see the underside of fittings.
5) Escalate if Needed
- If no leaks appear at 1–2 psig, cautiously increase to 3–5 psig if your hardware allows.
- Consider immersion testing (submerge a small subassembly in a pan of solution) for stubborn cases—only for removable parts that are safe to wet.
6) Depressurize and Clean
- Slowly vent back to atmosphere.
- Wipe all treated areas with DI water and lint-free wipes to remove residues.
- Dry thoroughly; inspect for any fluid that may have wicked into cavities.
What Bubble Size Tells You
- Large, rapidly growing bubbles → likely a gross leak (loose clamp, missing O-ring, cracked fitting).
- Small bubbles that slowly expand → smaller leak path or permeation through an elastomer.
- No visible bubbles despite suspected leak → may be a virtual leak (trapped pocket), a microscopic leak below the bubble method’s sensitivity, or a leak that only opens under vacuum/thermal cycling.
Advantages of Bubble Leak Testing
- Low cost: No specialized detectors or training required.
- Speed: Excellent for quick triage before precision testing.
- Visual localization: You see exactly where to repair.
- Field-friendly: Minimal kit; useful for service calls.
Limitations to Keep in Mind
- Limited sensitivity: Not suitable for micro-leaks required in high/UHV sign-off.
- Operator dependence: Requires patient, systematic coverage.
- Residue risk: Some solutions can contaminate surfaces if not cleaned.
- Not representative under vacuum: A joint that seals under slight positive pressure may behave differently under vacuum (and vice versa).
Best Practices for Reliable Results
- Prefer nitrogen over shop air to avoid moisture and oil carryover.
- Thin, uniform film beats heavy foaming; bubbles reveal faster.
- Work in zones: Divide the system into logical sections and complete each fully before moving on.
- Don’t forget the foreline: Many leaks hide in pump carts, foreline traps, and roughing valves.
- Record findings: Note pressure, fluid used, locations, and corrective actions—useful for trend analysis.
- Re-test after repairs with the same conditions to verify the fix.
- Follow with helium testing for critical tools; bubble testing is a triage method, not a final spec for high vacuum.
Common Applications
- Industrial vacuum packaging lines and roughing manifolds.
- Food processing sealing systems and thermoformers.
- HVAC and refrigeration service (adapted for materials/fluids).
- Educational and research labs for benchtop chambers and fixtures.
- Maintenance checks on forelines, roughing pumps, and service carts.
Troubleshooting Corner
“My base pressure is erratic, but I can’t find bubbles.”
Try warming elastomer joints slightly (e.g., with a low-temp heat gun from a safe distance) while testing; thermal expansion can open marginal leak paths. If still nothing, suspect a virtual leak (blind tapped hole, trapped volume) or outgassing; proceed with RGA and helium mass-spec methods.
“Bubbles show up at a compression fitting even after re-tightening.”
Inspect the tube end for scratches and burrs; replace ferrules. For persistent issues, switch to orbital-welded connections in critical paths.
“Soap solution left a film on my viewport.”
Rinse with DI water, then final clean per your optics protocol (e.g., isopropanol and lint-free wipes). Next time, mask the viewport and test around the seal only.
Alternatives and Complements
- Pressure-decay / rise tests: Quantify overall leak rate but won’t localize the leak.
- Helium mass-spectrometer leak detection: Far higher sensitivity; use as the acceptance test for high and UHV gear.
- Vacuum rise tests with RGA: Identify species (water vs. hydrocarbons) to distinguish leaks from outgassing.
Conclusion
The bubble leak test is a practical, time-tested method for finding leaks in low vacuum systems. While it cannot match the sensitivity of helium mass-spectrometer testing, it excels at rapid localization of larger leaks, saving time and money during troubleshooting and maintenance. Used thoughtfully—with proper safety limits, systematic coverage, and thorough cleanup—it’s a powerful first-line tool in any vacuum technician’s kit.
If your vacuum system shows signs of leakage or pressure instability, the experts at High Vac Depot can help. From quick triage methods like bubble leak testing to precision helium leak detection and component upgrades, our team provides the guidance and hardware you need to restore performance. Contact us today to discuss your application and build the right leak-detection plan for your operation.


Leave a Reply
You must be logged in to post a comment.